The King, a fully modded original Xbox


Can't get more "Fully" than this
This thing is like the easter bunny on crack. You can't get much more "Fully modded" on an oriinal Xbox than this. Every aspect of this console has been altered and modified in some kind of way. In fact, is this even an original Xbox anymore?? Let's take a look at what's going on with this thing.
Work it from the inside out
I'll start from the inside and work myself to the outside. So let's start with the software. At first look you might think this fully modded original Xbox was hard modded, but it wasn't. This is only soft modded. I will go into the disc drive and how it was removed later. But just keep in mind, this is simply just a soft mod. This was also a project to karate-chop people who hate on version 1.6 consoles. No, they can't be tsop flashed, but you can still end up making an incredible console. We used our very own softmod kits to complete the softmod that have everything you need to perform a softmod on your original Xbox console!
Get an original Xbox softmod kit! CLICK HERE!
The Hardware
Though this fully modded original Xbox console is not hard-modded, there are a lot of hardware mods and changes. So let me dig right in to everything I did on the hardware side.
My beauty, The King, is equipped with an INTERNAL Wifi kit. That is correct, it has wifi, and it is internal, and it is fully compatible with all modern routers and wifi set-ups. In fact you can get this Original Xbox internal wifi kit, and install it on your console too!
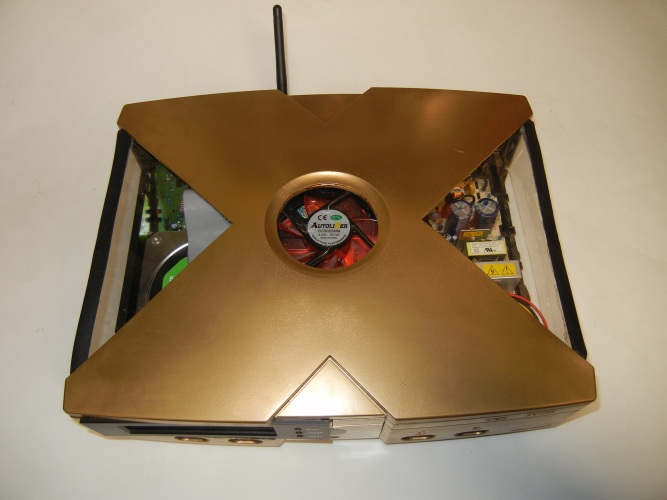
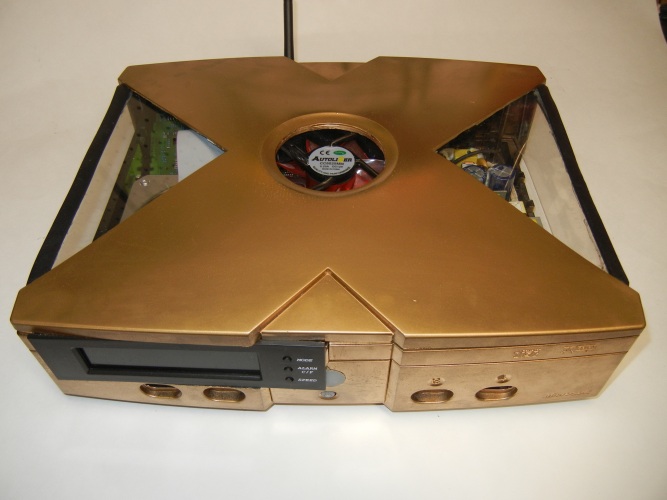
I think one of the most obvious hardware changes was the fact that there is no disc drive and a large LCD screen is in it's place. Much to your surprise, this is not the X3 LCD mod that most people know about. This LCD screen is actually a fan and temperature control module. This also allowed me to install a second fan where the Jewel was. The amount of cooling power in this fully modded original Xbox is second to none. The LCD screen also allows me to cycle through the different fans at any time, check their current performance and adjust speeds as needed. This also has multiple temperature points that allow me to moniter the CPU,GPU, Hard drive, and over-all internal case temps as I wish. I have full control of my internal temps at all times and will be able to prolong my hardware life for a very very long time with this fan control module.
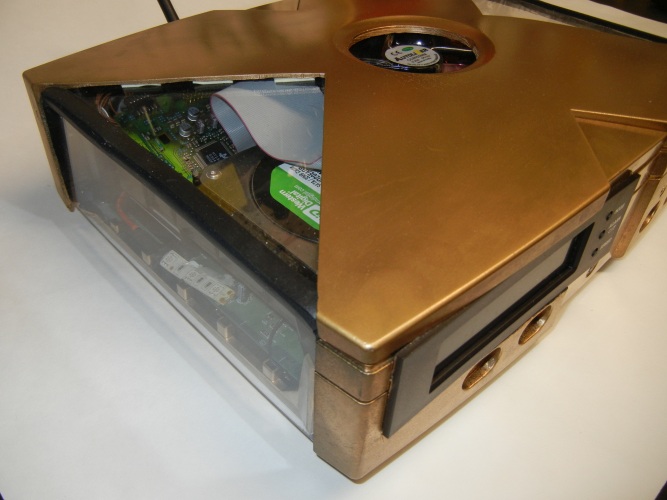
Most people will tell you that the only way to remove a disc drive and go without one is to hard mod or TSOP flash the console. This isn't really true. In fact that was one important feature I wanted to show off because the 1.6 motherboard is hated on by many modders as though it is limited, but that just isn't the case. In a normal situation, powering on the Xbox triggers the motherboard to check for a disc drive. What most people don't know is that it doesn't REALLY check for a disc drive, it just checks that it gets a legit signal from the disc drive PCB. So, you can simply pull a disc drive PCB out of the drive, plug it in and mount it. The disc drive pcb is tiny compared to the disc drive itself and frees up a ton of space inside the console.
Removing the disc drive made it much easier to fit the internal wifi kit and the fan control module. It also allowed me to change the position of the new 2TB hard drive. The hard drive is now mounted going sideways where the disc drive use to be. I like this because I was able to elimate the massive, guady hard drive caddy. This also had a big advantage because the massive side windows in the case that actually bend around the corner of the console now show off more of the console guts than just the big black drive caddys, which I find kind of ugly and boring. Removing the drive and moving the HDD also allowed me to add that second fan where the Xbox jewel was. This is the perfect spot for a fan as it sits right on top of the motherbord heatsinks. This could not have been accomplished with those big drive caddies blocking the way as the fan wouldn't fit and even if it did, the caddies would have blocked the airflow to the motherboard anyways.
After I first showcased this fully modded original Xbox console a lot of people asked me to build them consoles as well. I usually only offer kits and tutorials on how to do it yourself but I decided to offer a new option where I will fully build a modded original Xbox console for you with the features and options you want!
Let me build one for you! CLICK HERE!
The case mods
I think all my viewers know I LOVE case mods. I love designing drawing, and building the cases. It is my favorite part of modding! As you can see with this project, I went all out for the case mods. I altered so many aspects of the case that a fellow modder friend of mine didn't even realize it was an original Xbox at first glance! So, here is everything I did to the case.
This fully modded original Xbox console has an ambitious window mod. I decided to make the two windows actually wrap around the side of the console as well. I used some modified rubber strips to clean up the lip where the windows meet at the corners which turned out really nice and really clean looking. This window took a TON of work to get it done, I actually ruined the first case I used as getting the side windows to line up right and hold pexi-glass took quite a bit of tinkering. For this reason I decided I would not offer this particular window design in a kit as I had originally hoped. You wouldn't be able to install it like my other kits as there would be a fair amount of work needed to get the wrap around part to line up and install correctly. However, you can still check out this Original Xbox case modding kit if you are interested in a pre-made case mod kit.
Just a few side notes on the case mods. I also had to modify the rear of the case to get the Wifi antenna set up as well as the ethernet bridging connected. I also had to cut out the Xbox jewel to install the new fan.
The faceplate was quite a task as well. At first glance it looks like I just simply removed the disc drive and put an LCD screen in it's place. However it was much more involved than that. The screen is so large that I actually had to cut out and completely eliminate the eject button. That was fine since I wasn't going to have a disc drive anyways. However I still needed the power button and I still wanted a "Power" light. So, I took the power/eject button board and mapped out a trimming I could do on the board to remove the eject button stuff as well as the old LED lights, So the power/eject board is still there but it has been significatly trimmed down and only has the power button now. For the power light I had to actually mold glue into the old eject button hole. Once I was able to get a mold for the glue, I then added another LED light into the glue and allowed it to set. This covered and sealed up the old eject button hole in the faceplate and also gave me a power button light as well. Using glue might sound like a strange choice but I think the result turned out really well.
The LED lights were way over the top. The second fan has 4 red LEDs, I used 18 LEDs inside the console itself as well as the led I used for the new power light in the faceplate. That makes 23 LEDs in total. I was comfortable using so many LED lights because the removal of the disc drive meant I could use up more power for the LED lights that normally needs to be used for the disc drive. So once again, the term fully modded original Xbox really does apply to The King, I did everything to the fullest on this build. I also make LED kits for my users and their original Xbox consoles. If you want to light up your cosole like this one is, make sure to check it out!

